
Check here for commonly-asked questions about how to use the Ixthus Catacombs.
If your question isn’t listed here, please contact Marilynn to ask, and it may show up here in the future.
****
Profile and Activity
- Type their name or email address into the search box in the righthand column or up by your notification bell, and hit enter or click the magnifying glass to begin your search.
- Scroll down the list till you find your friend.
- Using your friend's email address will be the most direct way to find them using the search box.
- Join groups that you and your friend enjoyed on other social platforms and see if they are in those member lists.
- Take a look at the Members widget in the right hand sidebar. If your friend is a new member as well, they might show up in the Newest sort column. As the widget only shows 5 names at a time, you can click the Members title to view the entire member list and sort it by Newest, Active, Popular, or Alphabetical.
NOTE: Not everyone likes to be found via a member list! If you are found to be spamming people you don't know with friend requests, you will be removed from the site!
SECOND NOTE: If you are getting friend-spammed by people you don't know, use the block/report feature in the members list or on the offending person's profile, and admin will deal with them.
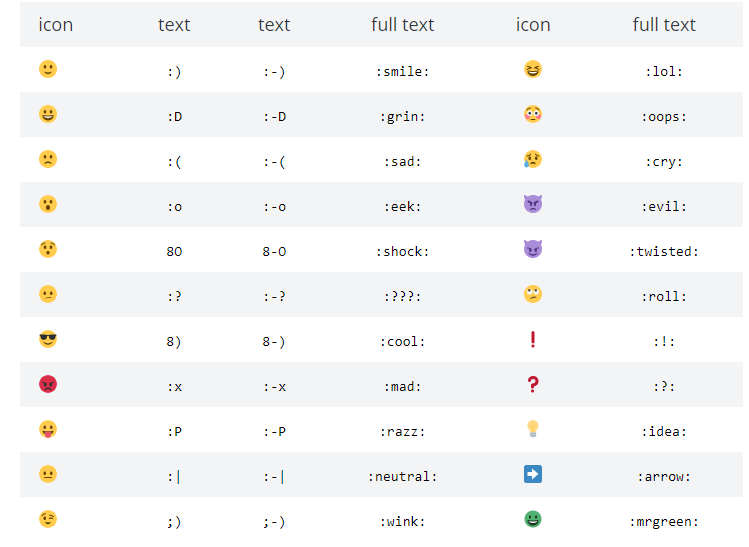 Alternatively, there is a widget in the left hand sidebar of the main activity feed (clickable from top menu bar) or right hand sidebar in groups or personal profiles, that lets you:
- Scroll to find the emoji you want,
- Highlight it, then
- Hit copy (ctrl-c(win/linux) or command-c (mac)),
- Return to what you're typing, and
- Hit paste (ctrl-v (win/linux) or command-v (mac)) to add it to your post.
Due to the fact these emoji's take on the same size as the font you use on your keyboard or that is used on the website you are typing in, they can appear quite small and lose some of their details. If you want to see an emoji larger, right click on the emoji in someone's post, then choose "open image in new tab". The image loads from the Get Emoji repository and opens to full screen!
- Create a Collab Document inside your profile that you share with logged-in users.
- Add to a Collab Document inside a group created for that purpose. If you don't see a group set up for what you offer, feel free to create it and encourage others to join who offer similar things, and set up a Collab Document in the group for others to add to.
- Create a document on your computer, then upload it to BuddyDrive, and share it with others as you see fit.
- Create a listing in your profile's "Listings" tab.
If you are a group admin wanting to hold a meeting in The Great Hall, contact the site admin (Marilynn Dawson) to have a meeting room created for your group. Choose a name that matches your group title as this will be your meeting room all the time and let her know if it should be scheduled for a certain date and time. She will give you a meeting code that you share in your group for your group members to access the meeting room in The Great Hall.
Group admins can add requested shortcode to a custom page inside their group management area, to create a subpage of their group to bring The Great Hall inside their group. Name the page "Great Hall" so that members know what to look for. Add the shortcode and save, being sure to click "display it" before saving. In order to create this page, you'll need "Group Extras" enabled. Admin has to approve this on the back end before you can enable it, so when you request your shortcode, you'll also get this enabled at the same time and can then go into your management area, enable extras, then return to that tab to create your page for in-group meetings.
Notes to Group Admins: Be sure you have this page created just as you want it before hitting save, as going back to edit this particular additional page will error out the shortcode and you'll need to know text-based coding to delete the backend of your page and redo it. (If you don't simply delete the page altogether and recreate it)
Meeting operators should password-protect their meetings as well, either before everyone arrives, communicating the password to them, or after everyone has arrived to keep others out after the meeting has started.
Familiarize yourself with your meeting room by entering it alone the first time. Get used to where all the controls and options are, then tell your members the code so they can join at the appointed time.
You may want to institute rules around joining your meeting room, such as only doing so when you have set the time, etc. If you find your members are going in at all times of day and you can't hold proper meetings anymore, Have the site admin delete your room after each meeting and recreate it for you before each meeting.
Thanks for wanting to support our efforts here.
***
Groups
- Start a thread in Updates and Support asking to have "Group Extras" enabled for your group.
- Admin will enable it for you.
- You can now go to your group management area and check that you want extras activated for your group on the front end, and return to that tab in management to configure the extra fields or create pages as you desire for your group.
The Announcements tab of any group-fan page, is a forum system. it is the same forum system in regular groups, but in a fan page setup, it only allows the fan page admin to create topics. Announcements may not show up in the fan page's main activity feed. Click the Announcements tab to review those threads, or check the topics righthand sidebar widget to see some of them as well.
Visit the group, and create your image-related post there.
There is a sidebar inside groups that will show you recent forum activity. Do note that this sidebar shows you recent activity across any of the site's group forums. If you are not a member of the group a private forum is attached to, you won't be able to view or interact with that forum's topics.
A lefthand sidebar in the main activity feed lists all the group forums of the site as well. If you see a forum listed there that has a group name you don't see in the group list, let admin know and they will remove it.
***
Events and Listings
NOTE: Listings that contain "adult", "scam", "alternative lifestyle", or other related content, will NOT be approved. Some regions ban the sale of animals online as well.Accordion Sample Description
To edit the description of your classifieds listing, click on Listings in the top menu bar, go to your listing, then click the edit button below that. This will kick you into the back end of the site to the wordpress edit screen where you can change the text of your classified ad. Be sure to click the update button near the top right of the edit screen before leaving.
Click the view link that appears above your listing's url, to return to the front end and carry on.
Click on Events.
Click on My Events in the white menu bar.
Click on Add New and fill in all desired information for your event.
***
IXTHS Coin (points system)
 IXTHS Coins are points you can earn for doing various things around the site, or selling listings using an admin-set flat rate. They are not actual money, nor are they crypto-coins. They are part of a larger system called gamipress that we will use to build an internal parallel economy.
These can only be earned and spent in-site and there is no way to exchange them for any currency, digital or otherwise. If you shop where you earn grocery points offline for example, those points can only be spent at the store where you earned them and have no cash value. It is the same with IXTHS coin.
- Get your listing approved by requesting approval in the Update and Support group's forum.
- After approval, go to your profile's listings tab and click "View".
- Copy and paste the following shortcode into a comment on your listing:
- Create a new collab document, or edit an existing collab document
- In the main text window, type in your item for sale and all it's appropriate details.
- Copy and paste this button code as the last line of your sale entry in the document:
- Click the comments tab and look for a comment with a Buy Now link.
- Click that link. You will be taken to a thank you page. You can confirm that IXTHS were removed from your ledger by returning to your profile and looking at the right hand sidebar for your IXTH transactions.
- Click the Buy Now button underneath the item you are wanting to buy. You can confirm that IXTHS were removed from your ledger by returning to your profile and looking at the right hand sidebar for your IXTH transactions.
- Hit the buy now button in the course description,
- Return to your profile to copy the deduction ledger note,
- Go back to the course and click the Add to Cart button. In the top menu bar you'll see your shopping cart now, with the dollar value showing. Click that and and put the ledger note into the Extra Notes box before clicking "Store Gateway".
25 IXTHS Coin: Update your personal profile. You can earn this once a week if you are updating your profile that often.
5 IXTHS Coin: Create a blog article in your "Blog" list.
Accept an invitation. Your contacts who arrived because you used the
Invite Anyone feature, will get this coin addition.
3 IXTHS Coin: Get accepted to a private group.
2 IXTHS Coin: Share something on the Activity Feed.
Share something in a group's activity feed.
Get a reply to something you shared.
1 IXTH Coin: Log into the site. This can occur once per day.
Join a group.
Accept a friend request.
1.Clicking the Buy Now link in the first comment under a listing. Listings are reachable from the site's top menu bar.
2.Clicking the Buy Now button, typically found either in a course description, or a Collab Doc in a buy and sell group.
See the FAQ on buying and selling with IXTHS Coin for more info.
3. When you comment on someone's share in the Activity feed. This acts as a kind of tip to thank them for taking the time to share something you feel is worth responding to.
***
Documents, Courses, Etc.
- should go into a group or not,
- is public to the world or just to logged in users
- is editable by "doc author" (you) or by logged in users,
- whether logged in users can comment or just yourself,
- if anyone, logged in users, or yourself can read those comments
- who can view the history: anyone, logged in users. yourself,
- etc.
At this time, there is no way to limit logged in users to just your friends. So be careful which documents you make editable by "logged in users". Also limit the time you DO make it editable by "logged in users" so that ideally, only those who agreed to collaborate with you on a document will do so. Alternatively, whenever someone needs to add an update, they can request that you unlock the document so they can go in to do the edits.
Examples of non-editable documents by others: Personal Todo lists, shopping lists, long-winded posts you want to share. Etc.
Examples of editable documents you may wish to create: Meeting times, who has what in your neighbourhood, projects, etc.
- 1) Create a group and ensure it has BuddyTasks, BuddyDrive, Collab Docs, and Forum enabled and configured.
- 1.1) BuddyTasks will be where you show everyone the day's lesson title and any tasks required to complete the day's lesson.
- 1.2) BuddyDrive will be where you upload PDFs and other course materials, organized into folders. If you tend to offer various courses at various times, you'll want a folder for each course, and perhaps subfolders denoting the lessons each group of materials go with.
- 1.3) Collab Docs is where you'll put interactive assignments for the class to work on.
- 1.4) The forum is where your students will socialize around your course content.
The above group areas allow you to configure a workshop, a challenge, or a course. It doesn't offer built-in quizes or any grading system. It also doesn't offer a way to pay for the course. To ensure payment for your course, create a collab document that only you can edit, and add the IXTHS payment button to it, OR Ask site admin to create a downloadable product for sale that requires credit card. The downloadable PDF should include your course name, your name, your group name, date of course, date registration will end, what the student will learn in the course, etc.
- 2) The second way to create a course is to visit the Academy Dashboard and request to become an Instructor.
- 2.1) Once approved, you should complete your profile, and in the withdrawal settings where it says "Physical address" put in the email address where you want to receive e-transfers. This is a developer oversight as the setting to receive e-checks as they refer to it, requires an email address, not a physical address.
- 2.2) When you click to create your course, you will be sent into the back end of the community website. Focus on the course creation steps in the main window for the bulk of your course creation efforts.
- 2.3) If you are wanting to sell your course, for IXTHS or for actual fiat currency, your course will need to be linked to a product in "Easy Digital Downloads", known in the backend simply as "Downloads". If this is unavailable to you, you will need to contact site admin to create the digital product for your course. The info you send will be the same as for creation of a digital product for your group-style course. Once the digital product is made, you can edit your course to link it to the product to sell.
- 2.4) To sell your course using IXTHS, add the buy now button code to the course description as the last line of the description. Tell your students to see the FAQ on buying courses with IXTHS. NOTE: If someone clicks on "Store Gateway" without having clicked the buy now button in the course description first, there will be no note in the Extra Notes section (as per the FAQ on buying courses with IXTHS). You are not obligated to allow that person to continue with the course when you discover that they tried to buy without sending you any IXTHS.
- Give your blog post a title.
- Type out your long-form piece and format it how you choose. You have access to the visual and text editor to do this. Click each option to see the formatting capabilities of each and use the one you are most comfortable with.
- Add any images you want to place at various points in your piece if you want images to better present what you are writing about.
- Add a feature image if you wish. This isn't necessary, but people are used to seeing it on other blog presentations.
- Click the publish button.
- Click on Collab Docs in your User Menu in the left hand side bar.
- Create a new document.
- In the document screen, you have most blog-like creation features available. Build your article as you normally would.
- Set the edit permissions to "article author".
- Set view permissions to "logged in users".
- Set comment permissions to "logged in users".
- Set view changes permissions to "article author", unless you want site members to know about change dates if you have added any edits since publishing your piece.
- Save your document.
When you click the arrow beside this link, you'll see the Villager Blog, which is internal to Catacomb members only and hidden from public view. If a logged-out visitor tries to click that link, they'll be asked to log in to view it.
BuddyDrive is your personal cloud storage here at Ixthus Catacombs. It works in a manner similar to Google Drive or DropBox, but without the desktop component to do any syncing.
BuddyDrive is accessible from your User Menu, as well as from inside any groups where admins have enabled that feature for their group.
When you first enter BuddyDrive, you won't see any folders. The icons across the top of BuddyDrive allow you to upload a file, create a folder, sort your view of your files, and search for them.
 Click the little folder icon to create a folder. Click the vertical page icon to add a file. Files can be pdf's, pics, audio, video, etc.
After creating the folder or uploading the file, you can hit the pencil icon to edit things like privacy, and inside privacy, decide whether you, others, or specific groups have access. Sharing a link automatically gives access to the person you shared the link with, just a heads up.
Inside a group, you'll see BuddyDrive there as well if the group admin enabled it. When you enter BuddyDrive there, you will only see files uploaded for that group. If you upload a file to a group's BuddyDrive, it will be visible to you in your own User Menu BuddyDrive view as well, because you are the one who shared it. You'll notice it has a different privacy symbol from other files in your BuddyDrive however.

This way, you have control over the files you share and who you share them with. The above screenshot showing three of the privacy icons gives you an idea of how you'll see your files after choosing one of several privacy options available to you.
***
Rules of Engagement
Romans 12:18 If it be possible, as much as lieth in you, live peaceably with all men.
Be the one that leaves the interchange peacably if at all possible.
When not possible, or the person is offensive, use the block or report feature. If too many people report a person for offensive behaviour, the person will be suspended and if offensive behaviour continues too many times after suspension is lifted, they will be banned.
Get to know people either by interacting with them in the All Members tab of the activity feed, in groups (and private group activity does show up in the groups tab of the main activity feed), in public messages, private messages, in group forums, etc.
When you feel you've gotten to know someone sufficiently, request to join their friends list, but do not be offended if they don't accept. Everyone has their reasons for having large and small friends lists.
Groups admins may NOT demand to be in friends list as prerequisite for joining their groups! If this behaviour is observed, please notify admin for remedial action.
While we encourage you to create listings for what you wish to sell, create groups around what you do, collab documents around action you want to take, etc, unsolicited private or public messaging is discouraged here and could get you banned.
Yes we do. Click here to review. This is very basic, and may be updated if a doctrinal issue becomes large enough to require it's own entry in the Statement of Faith so everyone who visits is clear on where we stand.
***
Where to Get Help
Alternatively, if your question relates to group activity, ask inside the group you are part of, and others who know how to solve your problem may pitch in.
If your question is related to your profile or other activity around the site, feel free to ask in the activity feed to see if any friends have the answer.
Lastly, check the Site FAQ's (what you are reading right now), to see if an FAQ has been added that answers your question.
If you are unable to get help there, or you are unable to log into your account, please send a support request to: support at ixthuscatacombs dot online.
If it is a login issue you are facing, be sure you have already clicked the "forgot password" button to reset your password, writing the new password down, and logging in with that.
Please give your site username and display name so that admin can compare that to the user list on the back end. Sometimes a log in issue is due to having typed the email address wrong when registering and admin can fix this with your correct email once your username has been located in the list.
Please whitelist the support email address. Various email systems handle this differently, but failure to do this may see responses from admin land in your spam or junkmail folder.